How to Install WordPress Plugins – Step 5
In Step 5 we will show you which feature add ins, called Plugins, to install and how to install them.
NOTE: You do NOT need to install these Plugins for your website to work. By this step your website should be up an running and able for you to add your content. However you will want to install most or all of these Plugins at some point. Especially the Plugin to backup your database.
If you would like to skip this step and move to Step 6: Adding Your Content then Click Here.
Here is what it is all about:
Until WordPress came about adding features and enhancements to a website was painful and involved hiring a programmer at a cost of hundreds to thousands of dollars. Even worse then the cost was the time and energy one had to spend working with the programmer to get the changes correct.
Now, instead of hundreds or thousands of dollars and weeks of time, with WordPress you can choose from over 10,000 feature add ins, called Plugins, that can be installed in minutes. Yes, I said minutes!
A Plugin is a software program that adds features to your website. These features could include anything from a Contact Me form to the addition of a shopping cart to sell products. There are over 10,000 Plugins, many of which are Free, that have been created which can be used with your website.
But how do you know which Plugins to install?
No worries! In this step we will provide a list and links to all the Plugins you need to install now.
Once you have those installed you can visit our on site directory to see what else you might need.
We have created a directory of over 150 of the best Plugins we can find right on our website, Build My Site for Free. Plus we have many articles in our WordPress Tips and Tricks section that will teach you how to use the best Plugins for specific applications like adding Social Media to your website.
Feel free to improve your website as often as you like!
Here is what we’re going to do:
- First we’re going to provide the list of “must have” Plugins that everyone should install now.
- Then we’re going to show you how to install them
So here is what you need to do:
Click on the link for each Plugin in the list below, find the download link and then click on that link to download each of the Plugins to your desktop: DO NOT OPEN the downloaded Zip files. Just leave them as they are.
- Google Adsense: Aiming at simplicity, AdSense Now! does only one thing: it puts your AdSense code in up to three spots in your posts and pages (both existing ones and those yet to be written).
- Share This: Let your visitors share a post/page with others. Supports e-mail and posting to social bookmarking sites.
- WordPress Automatic Upgrade: Every now and then you need to upgrade WordPress to the latest version, with this plugin you can do so by clicking to upgrade and it is taken care of for you, even backing up your site before the upgrade.
- WordPress Database Backup: On-demand backup of your WordPress database-download the .zip file.
- TweetMeMe: Adds the TweetMeme button into your posts and RSS feed.
- Google Analytics: Google Analytics is a free, and very impressive, statistics package. Easily add the tracking code to your pages with this plugin. Make sure you sign up for a Google Analytics account at Google.com.
- Google Sitemap: This plugin will generate a special XML sitemap which will help search engines like Google, Bing, Yahoo and Ask.com to better index your blog.
- All in One SEO: Out-of-the-box SEO for your WordPress blog.
- WordPress.com Stats: Tracks all the stats from your website right in your dashboard.
- WordPress Contact Form: A simple to implement contact form for your site.
Step 1: Now sign in to your WordPress website:
Go to http://www.yoursite.com/wp-admin and sign in with your WordPress user name and password.
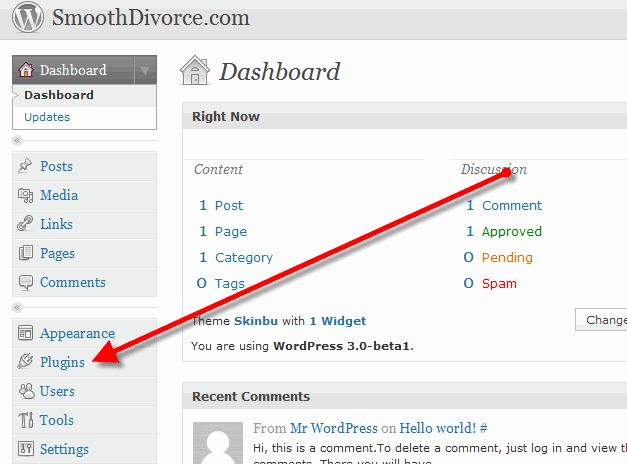
Once signed in you will see your Dashboard. On the left side of the dashboard is a tool bar which controls all the functions of your WordPress website.
Look down the toolbar until you see “Plugins” and click on that link.

Step 2: Manage Plugins
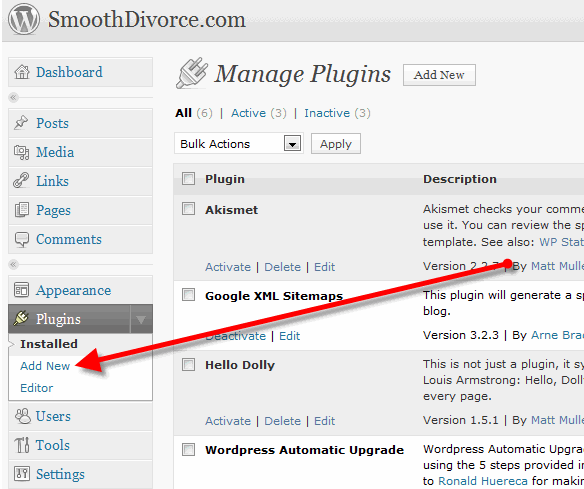
You will now see all the Plugins you have installed in your website.
Now click on “Add New”

Step 3: Install the Plugins
We’re now going to install the 10 Plugins you just downloaded to your desktop. For our example we’re going to install the Google Sitemap Plugin. Once you complete this install you can repeat the process for the rest of the Plugins on your desktop.
Locate the Google Sitemap Plugin on your desktop.
DO NOT open the zip file. You will install the zip file just as it is.
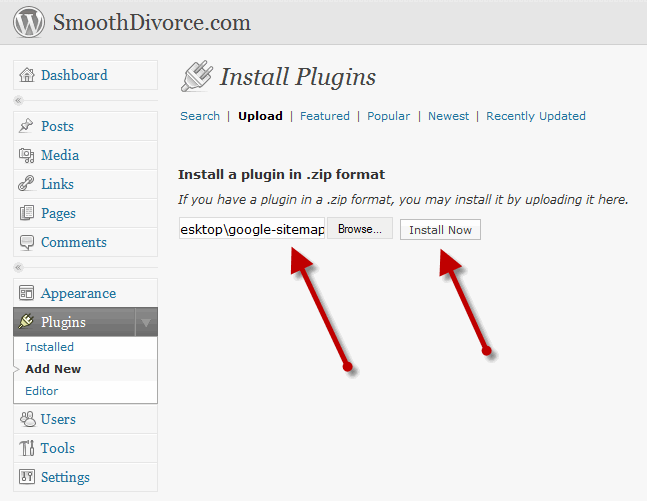
Now go back to the WordPress admin “Manage Plugins” page and click on the“upload” link as noted in the image below. Next click on browse and find the zip file on your desktop that you just downloaded.
Next click “Install Now” and in a few minutes it will be all done.

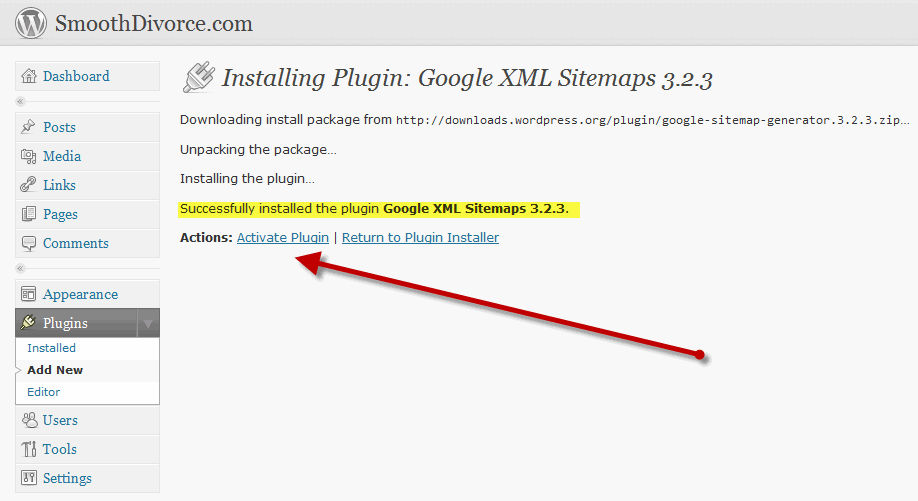
Now click “activate plugin” and you will be taken back to the Manage Plugins page.

Now you will see the XML Sitemaps Plugin on the list of active Plugins.
Here you will see the XML Sitemaps Plugin installed. For most Plugins that is all you need to do. In the case of this Plugin it has a “settings” link which may mean you need provide some information to set up the Plugin to run correctly. At this point you would click on the “settings” link and provide whatever is necessary.
If you are not sure what to do you will also see “FAQ” , support and links to the Plugin creator’s site that you can reference for more information.

Now you are ready start adding great features to your website. NOTE: You don’t want to add more Plugins then you need as you will find yourself constantly upgrading the installed Plugins as each one notifies you of updates. You will know that you need to update a Plugin each time you sign in to WordPress as there is a red “warning” icon by the Plugin link on the toolbar.
So good luck and have fun!
Congrats! You’re all done!
